Support will be discontinued
In October 2022, Microsoft ended support for Basic Auth for Exchange Online accounts (e.g. Microsoft 365 Accounts). This means that it is no longer possible to log in via Basic Authentication and Modern Authentication (based on OAuth 2.0) is mandatory.
In all moveIT products, there are now two ways to use Exchange Online accounts for communication (e.g. for order dispatch, discount synchronization,...) in the communication system. Both methods require app registration in the Azure AD portal:
Exchange Online (Modern Authentication)
Starting with version 50.40, there is the option "Exchange Online (Modern Authentication)" under Sender, in which authentication based on the OAuth 2.0 On-Behalf-Of Flow (Microsoft identity platform and OAuth2.0 On-Behalf-Of flow - Microsoft Entra | Microsoft Learn).
DISADVANTAGE
Microsoft introduced at the beginning of 2022 that by default a manual login is required every 90 days in this auth flow, which is impractical if the system runs in a batch system on the server without an interactive session. For this reason, we recommend using the following Auth variant:
Exchange Online (With Client Secret) [Recommended Variant]
Starting with version 52.40.08, there is the option "Exchange Online (With Client Secret)" under Sender, in which authentication based on the OAuth 2.0 Client Credentials Flow (OAuth 2.0 client credentials flow on the Microsoft identity platform - Microsoft Entra | Microsoft Learn).
A client secret is created during app registration, which can be made valid for up to two years.
With this variant, we strongly recommend restricting access for the created app to the corresponding mail account. You can find out how this works here. (Link Limiting application permissions to specific Exchange Online mailboxes - Microsoft Graph | Microsoft Learn)
The following is required for setup for both methods:
Microsoft Azure Active Directory users (usually the IT administrator who manages your Microsoft 365 accounts.)
Microsoft 365 admin user (usually the IT admin who manages your Microsoft 365 accounts.)
Microsoft Exchange Online Admin users (usually the IT administrator who manages your Microsoft 365 accounts.)
1 CREATE A (SHARED) MAILBOX IN EXCHANGE ONLINE (MICROSOFT 365 ADMIN CENTER)
First, create a new mailbox in the Microsoft 365 admin center or in the Exchange Online admin center, which you want to use for communication in your desired moveIT product.
If you create a mailbox via a normal user account, you have to assign a password for the account anyway. Remember this – this will be needed later.
If you are creating a shared mailbox, please go to [Users] [Active Users] after creating the mailbox in the Microsoft 365 admin center and find the user who has the same name as the one you gave the mailbox.
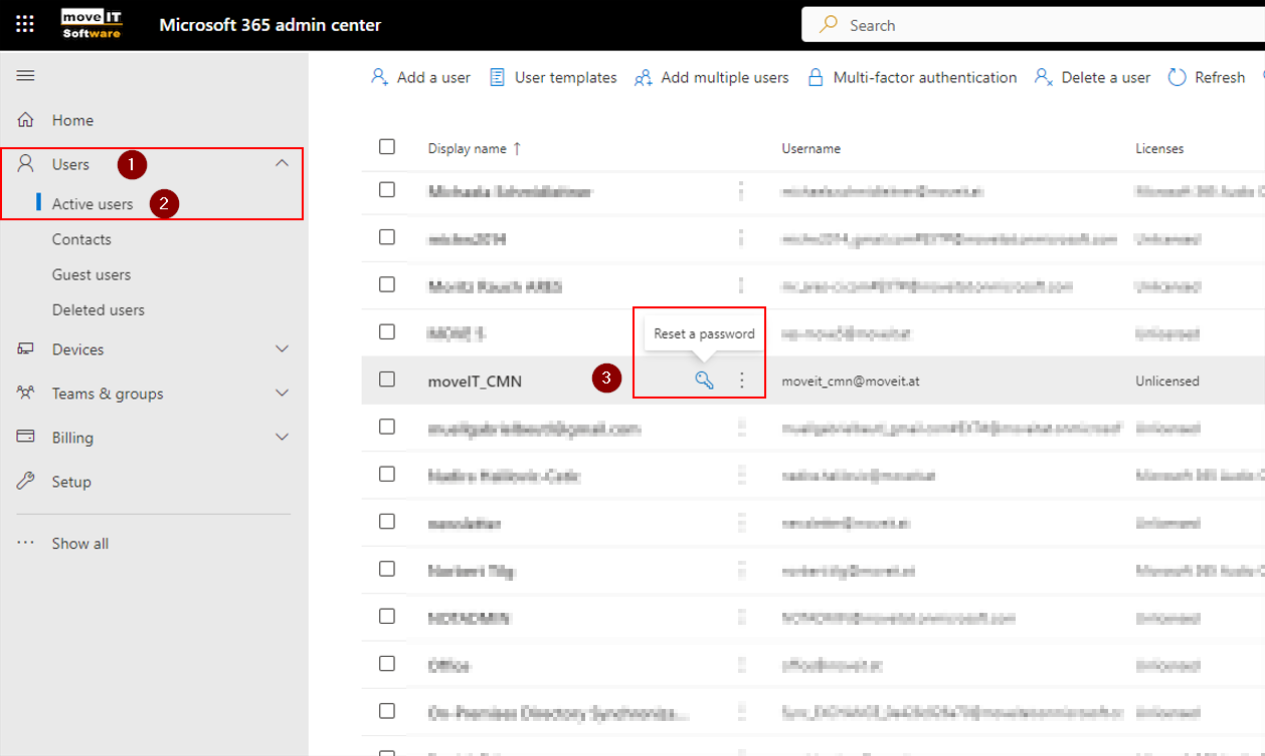
When you hover over the entry, you'll see a key labeled "Reset Password." Set a password and remember it – it will be needed later!
From here on, the configuration steps differ depending on the AUTH variant. Only expand the variant you want and only work through these configuration steps. If you want to switch from Exchange Online (Modern Authentication) to Exchange Online (Client Secret), you can modify your existing app registration to make this method work. Change the API permissions as described in step 2, create a secret client key and make the changes as described in point 3 in the moveIT communication system sender mask.
.png)
Exchange Online (With Client Secret)
2 Create an app registration
Next, it is necessary to create an app registration for Modern Authentication. To do this, go to your Azue Active Directory admin center and click on [All Services] in the top left corner.
.png)
From there, find and select [App Registration].

Then select [New Registration] from the toolbar

Give the application a descriptive name and the supported account types.
Normally, "Only accounts in this organizational directory (... - single client)" should be sufficient. Optionally, a redirect URI can also be stored. This can be the URL of your website, for example.

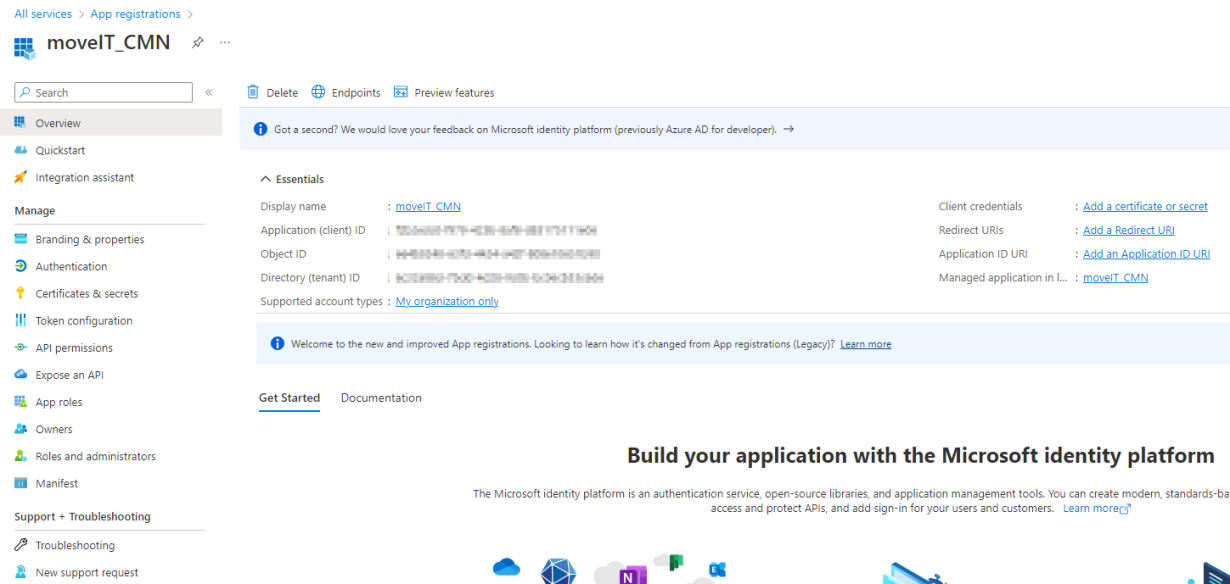
If your app has been successfully registered, you should be taken to an overview like this. Here you will see IDs ("Application ID (Client)" and "Directory ID (Client)") that are required in point 3.
.png)
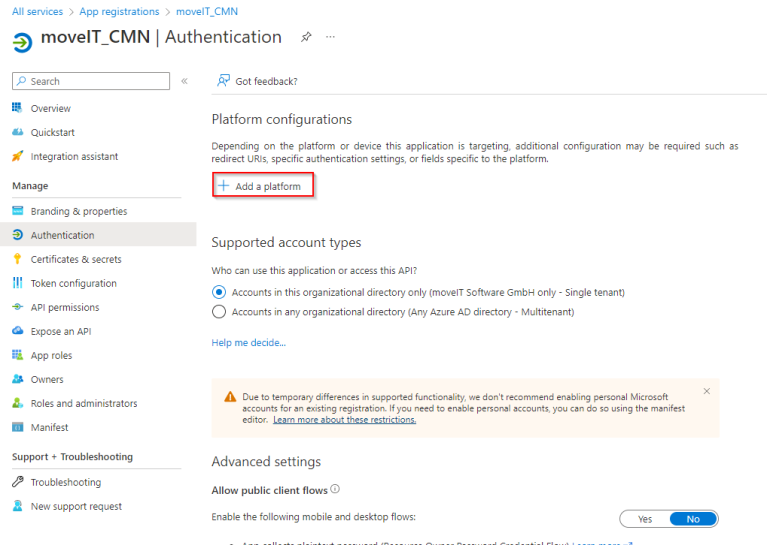
Then click on [Authenticate] on the left and then click on [+Add Platform].


Select [Mobile and Desktop Application].
.png)
Check the first two URLs and click "Configure".

Next, you have to define what exactly the app is allowed to do. To do this, navigate to [API Permissions] on the left side and then click [Add Permission].

Select [Microsoft Graph], and then select [Application Permissions].
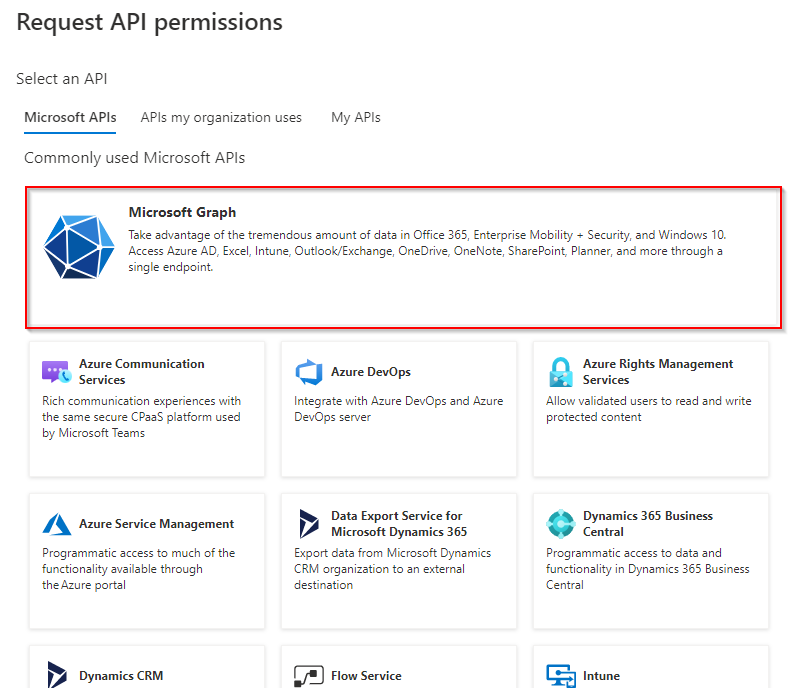
From there, select the following permissions and grant permission, or your administrator, permission to use them.

After that, a "Secret Client Key" must be generated. This is a secret string that is used by the application as proof of identity when requesting a token. This is also known as the application password.
In the created app, navigate to "Certificates & Secrets" and then click on "Client Secrets". Then select "New Client Secret". Enter a description and select how long you want to make this client key valid.
Key
Make a note of an appointment or to-do before this key expires so that you can create a new one and store it again in the moveIT communication system. Otherwise, the communication system will no longer work from the time of expiration.

The client secret is what appears in the Value field after it is created.
Client key
This client secret will only appear on the page after the following attachment and can then never be viewed in its entirety again. So either enter it directly in the moveIT communication system, as described in point 3, or write it down securely in a password manager app, for example.

Restrict access
We strongly recommend that you restrict access for the app to the corresponding mail account. You can find out how this works here. (Link Limiting application permissions to specific Exchange Online mailboxes - Microsoft Graph | Microsoft Learn)
3 Storing the account in moveIT
Log in to your moveIT system as a user with "Administrator" authorization and go to [Communication System] in the menu bar under [Applications].
Then click on the [Sender] button.

1. Then select the [New] icon in the top left corner.
2. Under Account Type, select [Exchange Online (With Client Secret)] setting.
3. Enter the address of the created account in " Sender address" and "E-mail address" in point 1.
Do not use a personal email address!
Never use a user's personal e-mail address here – always use the e-mail address of the account that was created for moveIT. We strongly recommend that you restrict access for the app to the corresponding mail account. You can find out how this works here. (Link Limiting application permissions to specific Exchange Online mailboxes - Microsoft Graph | Microsoft Learn).
4. Fill in the fields "Application ID (Client)" and "Directory ID (Client)" with the IDs displayed in point 2 after App Registration.

And fill the Client Secret field with the value that was displayed to you after creating the client secret in point 3.

Then click on [Save] on the "Sender" mask in moveIT and if necessary on [Test connection] to make sure that the setup has worked.
Exchange Online (Modern Authentication)
2 Create an app registration
Next, it is necessary to create an app registration for Modern Authentication. To do this, go to your Azure Active Directory admin center and click [All services] in the top left.
.png)
From there, find and select [App Registration].
.png)
Then select [New Registration] from the toolbar

Give the application a descriptive name and the supported account types.
Normally, "Only accounts in this organizational directory (... - single client)" should be sufficient. Optionally, a redirect URI can also be stored. This can be the URL of your website, for example.
.png)
If your app has been successfully registered, you should be taken to an overview like this. Here you will see IDs ("Application ID (Client)" and "Directory ID (Client)") that are required in point 3.
Then click on [Authenticate] on the left and then click on [+Add Platform].
.png)
Select [Mobile and Desktop Application].
.png)
Check the first two URLs and click "Configure".

Now it is still necessary to define what exactly the app is allowed to do. To do this, navigate to [API Permissions] on the left side and then click [Add Permission].
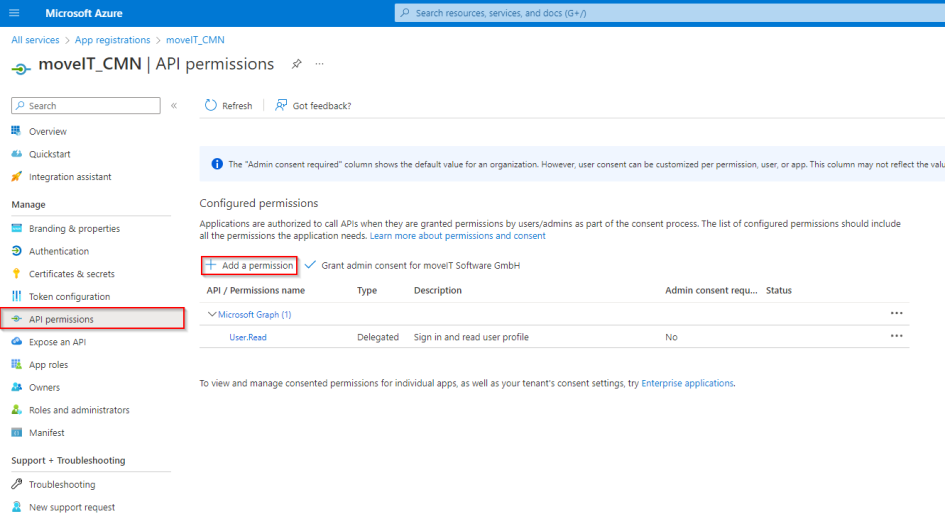
Select [Microsoft Graph], and then select [Delegated Permissions].
.png)
From there, select the following permissions:

3 Storing the account in the moveIT communication system
Log in to your moveIT system as a user with "Administrator" authorization and go to [Communication System] in the menu bar under [Applications].
Then click on the [Sender] button.
Then select the [New] icon in the top left corner and enter the address of the created account in point 1 under "Sender address ".
Fill in the fields "Application ID (Client)" and "Directory ID (Client)" with the ID's that were displayed in point 2 after the app registration.
Then click [Authenticate] – it will open in a window where you will be presented with a Microsoft login page.
.png)
Enter the username you used when creating the account at point 1 and click.
Do not use a personal mail account
Under no circumstances should you use a personal e-mail account here, but only use the account created specifically for moveIT communication.
Then enter the password and click [Login].

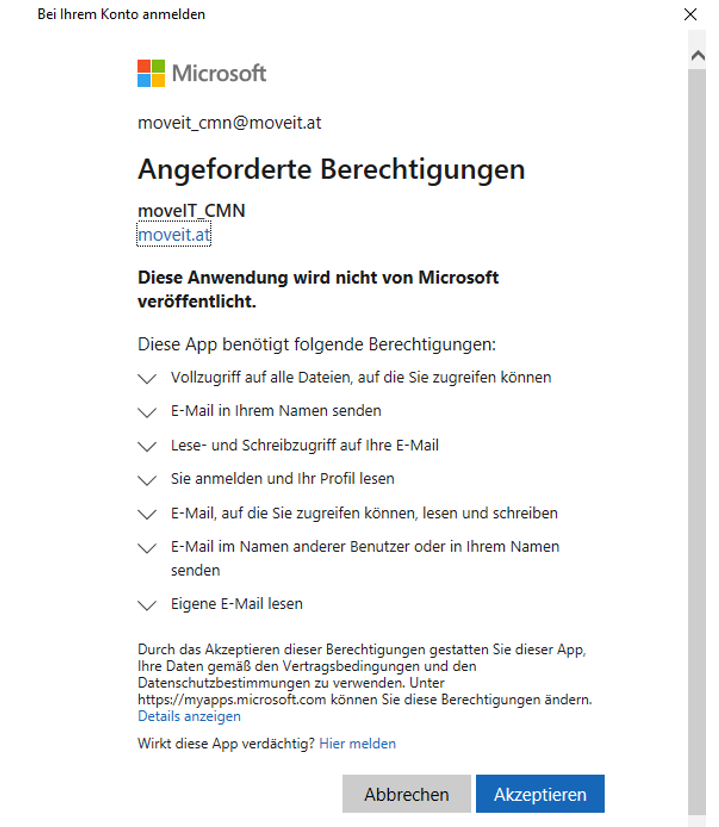
Finally, you will be taken to the following page, where you can see which permissions the app requires. This corresponds to the permissions set in point 2. Click [Accept].
Then click on [Save] on the "Sender" mask in moveIT and if necessary on [Test connection] to make sure that the setup has worked.